Travel north from the Vacant House to get to Lorule Castle. Once you cross the bridge and head to the door – Hilda will remove the barrier to let Link inside. Go inside the castle.
Lorule Castle
Once inside – travel up the stairs to the northwest near the door. Push the statue on the east into the lava. Travel across the wall towards the south to the chest that contains a Red Rupee. Travel back around and go through the door to the north.
Use the hookshot to stun the enemy and attack it with the sword until it dies. Now head through the door to the north. Go through the door to the south and continue south through the next door as well. Travel to the east and around to the south of the room. Travel across the wall to the west to find a chest containing a monster horn.
Travel back around and go through the door on the east side of the room. Open the chest to get a Red Rupee. Return to the previous room and go through the door to the southwest. In the next room – hit the switch to the north near the statues to spawn a portal. Now push both statues off to the north.
The Bomb Room
Fall down onto the platform below and grab the chest for a small key. Drop down to the south and enter the new portal to get back to 3F. Now head through the door to the northwest – the one with the Bomb statues. Head all the way north, place a bomb near the switch, and then run southwest towards the blue tiles.
Once the switch activates – travel across to the west. Place a bomb near the switch and go south onto the blue tiles. Once the switch activates go south. Throw a bomb near the switch on the east to get to the ledge using the red tiles. Travel north and open the chest for a Red Rupee.
Go back south and hit the switch. Now place a bomb near the switch and quickly run west to the red tiles on the opposite side. Now travel south once you go up and then throw a bomb over the red tiles on the east in order to blow up the Big Bomb Flower. Travel across the wall to the east to get to the Big Bomb Flower.
Hit the switch to lower the red tiles and lead the bomb flower west. Now go north once you reach the red tiles and continue until you reach the blue tiles. Toss a bomb to the north to lower the blue tiles and then throw one more toward the same switch. Quickly run through the blue tiles and the north once the red tiles lower.
Head west and hit the switch to lower the blue tiles. Cross over to the north and quickly run to the east. Use the bomb flower to blow up the giant boulder. Now open the chest for a small key and drop down to the east. Go through the locked and prepare to fight a Moldorm just like from the Tower of Hera.
After beating the Moldorm – travel through the portal. Now head through the door to the northeast. Continue north and go east across the purple platforms – they spawn when Link gets near them. Make your way to the northwest side of the room for a chest containing a monster tail.
Now travel back east then south. Take the path east when able and go north until you near the statue by the chest in the northeast side of the room. Move the statue to the west and wait for a ball to fall out. Go directly south following the ball and continue until the path no longer appears. Merge with the wall on the east and travel south until you reach the door.
Dodge the flying floor tiles and then go through the newly accessible door on the northeast up the stairs. Take the purple path all the way north – you will need to stay to the east – until you reach the spot with the chest and the falling balls. Make the purple path appear underneath the ball and run south in sync with it – being sure to merge where appropriate – to cause it to move the ball to the south.
Now travel north up the path to the chest for another small key. Travel back to the west and through the locked door to the north. Fight the Swamp Palace mini-boss just like before and then enter the portal on the northwest side of the room. Back in the room from earlier – head through the locked door on the northwest side of the room.
The Lamp Door
Go to the east and open the chest for the compass. Head back west and north through the door with the Lamp statues. Go up the stairs to the north and use the sword to put out the torch. Now study the now visible floors. Relight the torch with the lamp and follow the path you studied to the next torch. Repeat that process to make it to the chest on the northwest side of the room for a small key. Now travel to the northeast side of the room and use the key to go through the locked door for a fight with a Ball & Chain Trooper. Defeat it and go through the portal.
Getting the Red Mail
Head back up to 4F and use the sword on the torches to reveal a two paths south. Travel across to find a big chest containing the Red Mail. The Red Mail will half the damage delt by enemies again. Now travel back and use the hookshot to go through the hookshot door on the east side of the room.
The Hookshot Door
In this room – use the hookshot on the wall to the east to cross the gap. Continue east and then go north using the platforms. Continue north to find a chest that contains a Purple Rupee. Now use the hookshot to pull the lever to the west to activate the platform to the south. Ride the platform to the west, get off, and continue west. Merge with the west wall and cross the lava to the south.
Pop off and then use the falling hand to break the cracked roof with the eye. Travel back across the wall and get on the platform. Stand under the wired walkway and use the hookshot to grab the eye. Toss it into the holder to the north. Now get on the raft in the lava to the north.
Use the hookshot to pull the raft through the path to the north. Be sure to stop underneath the switch and wait for the hand to fall down on it. Continue down the path until you reach the end. Get off the raft and kill the guard. Now push the statue onto the center switch. Stand on one of the other switches until the hand starts to fall – quickly move away and onto the last switch.
Now go south and use the hand to smash the roof holding the eye. Carry the eye back to the raft and traverse back to the eye holder. Toss the eye into it to reveal a chest containing a small key. Now go through the locked door to the north and defeat the Swamp Palace boss once again. After beating it – go through the portal and the locked door in the center will open.
Go through the door to find Link once again inside Hilda's room. Travel through the door to the east and across the bridge. Break the skulls to refill hearts before heading through the door to the north. The room to the north is the Throne Room where the final battle will be held.
Lorule Castle Boss: Yuga
Yuga Stage 1
The Lorule Castle boss is Yuga except this time he has merged with Ganon. To defeat Yuga Stage 1 - dodge the attacks and then attack him with the sword. Continue doing such until Yuga is defeated; however, as the fight drags on – Yuga will perform more and more powerful attacks.
Near the end – the boss will rapidly appear and then vanish as well as toss its weapon towards Link. Simply attack it once after each of its attacks and continue until defeating the foul beast; however, there will be one final battle afterwards with a more powerful version so try not to take much damage.
Yuga Stage 2
At the start of stage 2 of the Yuga battle simply play tennis with the boss. Once it is hit once – Princess Zelda will give Link the Bow of Light in order to hit Yuga in painting form. Simply merge with the wall behind Yuga and shoot him with the Bow of Light to force him out of painting form. Quickly run over to him and attack Yuga with the Master Sword.
Yuga will now start sending lots of attacks from the walls towards Link as well as small flying obstacles. Dodge all of them and shoot him with the Bow of Light once you are able. Now run over and attack him with the Master Sword. Repeat this process several times to defeat Yuga – the Lorule Castle boss.
The End
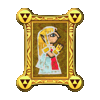 After beating Yuga – go north and free Princess Zelda from the painting. After you are able to control Link again – travel north and touch the Triforce. Now another cutscene will ensure before the final credits roll. You have now completed A Link Between Worlds. Thank you for using our walkthrough to do so!
Back to Part 15: Swamp Palace
